Wondering how to grease sealed ball joints or zerk fitting? The simple technics are discussed below in this article.
Ball joints are in constant motion whenever your vehicle is in motion. Furthermore, they are in place to ensure you do not have to steer with too much effort.
So your ball joints must remain in good shape for as long as possible. A reliable way to make sure your ball joints are perfect is greasing them as at when due. As such, this post will educate you on the appropriate way to grease sealed ball joints.
How do the ball joints work?
The car’s suspension system is connected to the wheels by the ball joints. It’s what enables both components to move together. A ball joint is no different from a pivot. They have a huge resemblance to our hip joints.
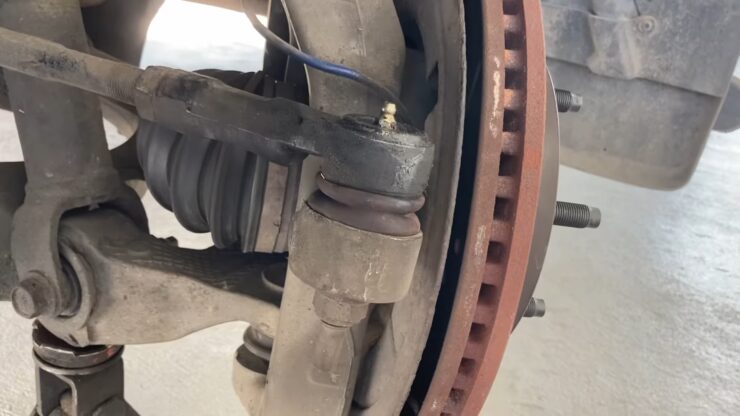
Ball joints comprise a socket and bearing stud that fit inside a casing that is lubricated. They are positioned to control the steering knuckles to the control arm, ensuring a solid and free movement within the suspension.
Most cars have a front suspension of lower ball joints only, whereas others have upper ball joints.
Different kinds of ball joints
If you are searching online for this, you will come across so many types. All those types are grouped under two broad categories: Upper ball joints and Lower ball joints.
Why do you need to grease a ball joint?
Every time your ball joint goes into action without the right amount of lubricant, it experiences a certain level of wear and tear.
As you use your ball joint, it accumulates impurities that could reduce the ball joint’s lubricating ability. Rust is another thing that can ruin these suspension parts too.
When a ball joint begins to deteriorate, you notice looseness on the suspension. With more looseness, the vehicle will wiggle more or jolt up and down.
If allowed to continue, that is an act that would eventually cost you more in terms of damages. Therefore, greasing your ball joint is just as important concerning smooth driving and ensuring safety.
Symptoms you need to grease your car’s ball joint
Certain symptoms show that you need to grease your ball joint. If you notice any of the following, you know it is time to have your ball joint greased;
- Clunky sounds whenever you move past bumps.
- Squeaking the suspension anytime is in motion.
- Drifting to either of the sides when you are supposed to be driving straight.
- The steering system starts to produce vibrations.
- Tire wears out unevenly.
Step by Step Instructions on How To Grease Sealed Ball Joints (Without Fitting)

Many people detest the act of greasing ball joints without fitting. That’s because they find the process to be tedious and frustrating.
Fortunately, this task is not as complicated as you think, particularly for those who know what to do. Let’s kick-start this section with the materials needed for this job.
Materials
- Grease injector needle
- Grease gun
- Grease
- Hose for the grease gun
Step 1: Do A Boot Check
First, take out the tire to enable you to check the boot. The chances are that your boot has accumulated a lot of dust due to how old it is.
You will need a new replacement if the boot is torn. Otherwise, you can proceed with the other processes.
Secondly, you need to prevent the grease from oozing out from the needle by cleaning the boot & joint with a rag. That is necessary to ensure the smooth passage of the grease inside.
Step 2: Grease Gun Preparation
Take your grease injector needle adaptor and snap it on your grease gun. You need a great deal of concentration while doing this, so you do not hurt your fingers. Make sure you tighten your needle injector adaptor.
It would be best if you didn’t tighten it to the point where you cannot open it later. Scan your grease gun to see if the end has a coupler. Can it be adjusted?
If yes, make it a bit lose to ensure the process goes without too much stress. Please, use the grease gun for the injector needle connection. Also, a new injector needle will be preferable.

Step 3: Inject The Needle Into The Boot
Since your boot doesn’t have any grease fitting, you can put your inject needle through the boot’s side. This will ease the passage of the grease down the ball joint’s bearing.
Getting this done can be a bit tough due to the tight bear within the boot. In that case, you can apply some extra pressure to get it in.
Step 4: Pump With Grease Gun
Connect your injector needle adaptor to the grease gun hose and pump the grease slowly. Do the pumping for some time, stop, and start again.
Do it consistently till you notice the grease pouring about the boot. Keep a close eye on the boot as you continue to pump.
Continue to pump until you see the boot swell. Be careful not to allow the needle to stick inside the boot.
It would help if you exercised patience while doing this, as it may take some time. With time, you’ll notice the oil coming out of the needle hole.
Step 5: Get The Needle Ejected
Now, you need to get the needle out of the injector. As well as removing the needle injector adaptor, use your rag to clean out any excess grease. Save the needle in its packet for later use.
Step 6: The Drive Test
Just make sure everything is in order before taking the car out for a test drive. Drive it through those bumpy roads, and observe the sound.
Take it back to your garage and check to see if grease is leaking out of the ball joints. Hopefully, if not, congratulations on a job well done.
Step by Step Guide on How to Grease a Zerk Fitting
This one is quite similar to what has been described above, except for a zerk fitting included in this very scenario. So how is this greasing process different from the one above? Let’s see how.
Materials
- Grease gun
- Grease
- Flexible hose
- And a rag
Step 1: Dust Boost Inspection
The first thing you need to do is check the dust boot for any leakage. If it is not in good shape, the best thing is for you to have it replaced. This is highly necessary to avoid premature failure in the future.
Step 2: Clean The Zerk
The grease you are putting inside should not be contaminated with impurities. That’s why you must clean the zerk fitting properly.
It needs to be bright and shiny before you fix it on the grease gun. Otherwise, change it before you continue with the process.
Step 3: Attach Grease Gun To Zerk
Here, it would be best if you got the grease gun attached to the zerk. Make sure the grease gun fits squarely with the zerk.
Press it down until you hear the adapter grab the zerk; if yours has an adjustable coupler, that makes this stage easier.
Try to make the clamp mechanism a bit lose and make it tight before you start pumping again.
NB: Grease will only come out when the grease gun’s nozzle hasn’t connected with the zerk properly.

Step 4: Pump Grease Till Booth Swells
Pump the grease gun slowly and observe the boot as you do so. Your target is to do it till you notice the boot swell. Stop greasing when you have noticed the boot swell.
With more than the required pressure, it is easy to compromise the seal holding the ball joint in position. So, it would be best if you did everything to avoid that from happening.
Step 5: Tilt Coupler Carefully And Detach By Pulling
Carefully tilt the coupler, and it will not be difficult to pull it out. If you do it well, it should come out easily.
You have to do this with a great sense of caution not to end up damaging the zerk. That might just set you back and cost you more.
NB: if your grease gun lacks an adjustable coupler, try getting one. It makes this process easier.
Step 6: Get Rid of Any Excess Grease
Use a rag to clean the boot and the zerk and ensure no excess grease remains. If you are done with that, you can hop into the car and drive around. You are to check if any of the joints are leaking.
Preferably, you should drive the car on rough roads with bumps to see how effective your work is.
Important notes
- The dust boot must be clean and in good shape before you do anything.
- Patience is an important virtue that is highly appreciated when you are doing this. It takes some time to grease your ball joints.
- Get all the old, contaminated grease out before forcing in the new one.
- Keep an eye on the boot as you pump the grease.
- Apply some more pressure on your coupler to ensure a tight seal.
Dos and Don’ts
If you want this whole thing to be as quick and painless as possible, you need to ensure you are not breaking any of these unwritten rules;
- It is not advisable to use your grease gun without a coupler. The coupler simplifies how you use your grease gun.
- Don’t drill and tap a zerk on a sealed ball joint.
- Whenever you are pumping the grease into the ball joint, you have to do it slowly. Do not be in a hurry when doing this.
- Don’t pump any grease again when the boot swells. The pressure must not be more than what is required to keep the seal in place.
- Do not apply extreme force when removing the coupler. If it is not coming out, keep tilting it till it becomes loose enough to come out easily.
- Do not test drive the car after you are done without cleaning out every extra grease you can find.
Frequently Asked Questions
What type of grease is required for ball joints and tie rods?
The type of grease required for ball joints and tie rods is typically a high-temperature grease that is specifically formulated for use in automotive applications.
This type of grease is designed to withstand high temperatures and pressure, resist water and other contaminants, and provide long-lasting lubrication and protection for ball joints and tie rods.
Some common types of grease used for ball joints and tie rods include lithium-based grease, synthetic grease, and molybdenum grease. It is important to choose a grease that is compatible with the specific type of ball joint or tie rod you are working on, as well as the type of vehicle and driving conditions.
When applying grease to ball joints and tie rods, it is important to use a grease gun or other appropriate tool to ensure that the grease is applied evenly and thoroughly. Over-greasing or under-greasing can cause damage to the joints and compromise their performance and safety.
How long can a greased ball joint last?
The lifespan of a greased ball joint can vary depending on several factors, including the quality of the ball joint, the type of grease used, and the driving conditions.
In general, a well-maintained ball joint that is regularly lubricated with high-quality grease can last up to 100,000 miles or more. However, harsh driving conditions, such as off-road driving, towing heavy loads, or driving on rough or uneven roads, can cause more wear and tear on the ball joints and reduce their lifespan.
It is important to regularly inspect and maintain your ball joints to ensure safe and reliable performance. Signs that a ball joint may be worn or damaged include squeaking or creaking noises, uneven tire wear, and steering or suspension problems.
Do you need to grease new tie rod ends?

New tie rod ends typically come pre-greased from the factory, and may not require additional greasing at the time of installation. However, it is always a good idea to refer to the manufacturer’s instructions and guidelines for specific recommendations regarding greasing.
In some cases, it may be necessary to add additional grease to the tie rod ends during installation or as part of regular maintenance. Over time, the grease in the tie rod ends can become contaminated or break down, which can lead to wear and damage to the joints.
Regular inspection and maintenance of tie rod ends, including checking and adding grease as needed, can help ensure safe and reliable performance of your vehicle’s steering and suspension system.
Where can red grease be applied?
Red grease, also known as chassis grease, is a high-performance grease that is typically used in automotive and industrial applications to lubricate moving parts and protect against wear and corrosion.
Red grease can be applied to a variety of automotive components, including ball joints, tie rods, universal joints, wheel bearings, and chassis components. It is also commonly used on heavy-duty equipment and machinery.
Some specific applications of red grease include:
- Ball joints: Red grease can be applied to ball joints to reduce friction and wear, and to protect against corrosion.
- Tie rods: Red grease can be applied to tie rod ends to help keep them lubricated and prevent wear.
- Universal joints: Red grease can be applied to universal joints to reduce friction and protect against wear and corrosion.
- Wheel bearings: Red grease can be applied to wheel bearings to provide long-lasting lubrication and protect against heat and moisture.
- Chassis components: Red grease can be applied to various chassis components, such as suspension bushings, to help reduce noise and vibrations and prevent wear.
How regular should I grease my ball joints?
The frequency of greasing your ball joints will depend on several factors, including the type of vehicle you have, the driving conditions, and the quality of the grease.
As a general rule of thumb, it is recommended to grease your ball joints at least once every six months or every 6,000 to 8,000 miles. However, if you frequently drive on rough or uneven roads, off-road, or tow heavy loads, you may need to grease your ball joints more frequently.
It is also important to inspect your ball joints regularly for signs of wear or damage, such as excessive play, squeaking or creaking noises, or uneven tire wear. If you notice any of these symptoms, you should have your ball joints inspected by a qualified mechanic and greased as needed.
When greasing your ball joints, it is important to use the appropriate type of grease and to apply it evenly and thoroughly using a grease gun or other appropriate tool. Over-greasing or under-
Verdict
That is how you lubricate a sealed ball joint safely. This is an interesting DIY task you might want to try because all the tools required are not far-fetched.
If you follow the instructions that have been spelled out here, you shouldn’t have any problems getting the job done.
Instead, they are easy to get. Save yourself the headache of buying new parts for your car when you grease the ball joints correctly.