Would you prefer your car emblem to stand out? Does the regular, shiny chrome color put you off? Well, you’re in luck. This handy guide will let you know how to blackout car emblems and make your car appear sleek, smooth, and glossy.
Why do People Blackout Car Emblems?
Before answering this question, we should first focus on the car emblem itself. Most emblems are made of plastic, and nearly all have a chrome-like outer coating. This chrome outer layer will definitely fade quickly, plus the scratches and scrapes are incredibly easy to spot yet difficult to remove. And then there’s the aesthetic side. Not many people like to have chrome emblems on their cars, so they would pay decent money to have the emblems blacked out.
Getting a black emblem might be a nuisance, whether you’re doing the blacking out or are paying someone else to do it. However, if you do it properly, you can really breathe new life into a car. All you need is the right material and the right approach. Luckily, this article is here to cover both.
Material Needed to Blackout Car Emblems / Plasti Dip Car Emblems

It would be best to have everything you need handy before deciding how to blackout car emblems. Luckily, the procedure doesn’t require too many tools nor materials, and anyone can do it in the comfort of their own home, or rather their own driveway.
Generally speaking, you will need the following:
- Plasti Dip
- Plasti Dip Glossifier
- Masking tape
- Old newspapers (transparent plastic or plastic bags will also do fine, as will masking paper)
- A toothpick, a pair of tweezers, or anything else thin and sharp but soft (to prevent scratches)
- Paper towels (or a high-quality microfiber cloth, if you can afford one)
- Hot water (a single 5L bottle will do) and a few empty bowls
- Liquid soap
How to Blackout Car Emblems/Plasti Dip Emblems DIY Guide
Step 1: Clean the Emblem Well

First off, mix the liquid soap with a bit of hot water in one bowl and clean the emblems well with the mixture. Next, ensure to scrub the logo, the letters, and the numbers well so that no dirt or grime sticks around. Finally, it’s a good idea to use a paper towel to apply the soap and water and a micro-fiber cloth to dry it off.
Any dust, dirt, grime, or debris on the emblems can affect how your emblem ends up looking in the end, and the results will not be appealing. Think of it as painting the gravel with lime — sure, the color is there, but it looks absolutely ghastly. Furthermore, the minute you scrape away some of the gravel, the non-painted parts will appear underneath. Your goal is for the emblem on your car to be jet-black, with no chrome paint showing, and dirt can do the exact opposite.
Step 2: Mask Everything Off Well
Now that your emblem is nice and clean, it’s time to mask off the car. Plasti Dip cans can cover anything within an area of 4 feet, at least. In other words, it is likely to get everywhere during the spraying. So, unless your car is protected, that Plasti Dip will be all over the hood or the trunk. In essence, knowing how to blackout car emblems is really knowing how NOT to blackout other bits of your car. This skill will also come in handy if you aim to blackout other chrome sections of your rig (like the door handles or the logo sections on the grill, or even the tail lights).
Take the masking tape and mark off the area around the emblems themselves. After that, use the newspapers (or other listed materials), place them all around the marked area, and then tape them up with the same masking tape. Make extra sure that the newspapers and the masking tape are tightly stuck to the car’s surface. You mustn’t allow any open space to show if you don’t want any of the spray to hit your car’s paint job.

Step 3: Apply the Plasti Dip

This step will cover both the Plasti Dip and the Glossifier. And while we do recommend using both, there are people out there who outright skip the Glossifier, which is fine enough. However, if you want to learn how to blackout car emblems and make them look classy, we suggest using both sprays.
Some DIY experts recommend dipping the cans in hot water some 15 minutes before use to achieve excellent results. Here’s where the hot water we mentioned earlier comes in handy. Use the remaining hot water, pour it into a different bowl, and then place the can there as instructed.
Once the can is out, shake it vigorously for an entire minute. The little metal ball inside of the can ought to start clacking at that point. Then, when it’s good and ready, you can start applying. The best method of doing so includes the following:
- Keep the Plasti Dip can be 12-16 inches away from the surface of your car, i.e., the emblem.
- Move the can slowly back and forth, making sure each stroke slightly overlaps with the previous one.
- Make sure you apply the Plasti Dip heavily enough so it appears wet and even.
- Make your first few strokes light and the finishing ones heavy
- Wait approximately 30 minutes between each coat of Plasti Dip
On average, you will need about 3-4 coats of Plasti Dip to reach your desired results, but we recommend going as far as 5 solid coats. That way, you have a better chance of covering every corner evenly.
Applying the Glossifier

This would not be a ‘how to blackout car emblems’ article if it didn’t cover the Plasti Dip Glossifier. The great thing about this product is that you don’t need to apply it in the same pattern as the regular Plasti Dip (although you can do exactly that and get the same results). Instead, you can spray it on using a circular motion.
Unlike Plasti Dip, the Glossifier will not require too many coats. Most people go for 2 rounds of spraying, as it produces the best gloss.

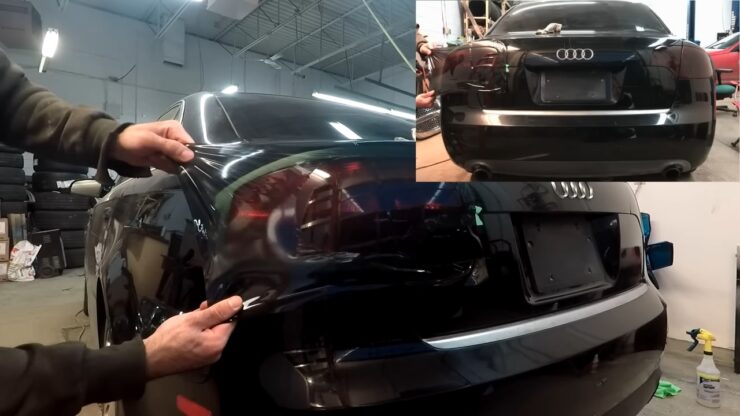
Step 4: Peel Off the Unwanted Plasti Dip/How to Remove Car Emblems
After you’re done applying the Plasti Dip, let it dry for at least an hour before peeling off the paper. During that time, you must keep your car away from any source of moisture. If you can, park the car in a garage or under a shed.
If you are not sure whether your coat of Plasti Dip is dry enough, gently touch the section of the newspapers/plastic bags/masking paper you sprayed. Should it leaves a residue on your fingers, it’s not fully dry yet. However, if it is dry enough, slowly remove the paper and the masking tape.
Since the Plasti Dip is still not completely dry at this point, you can use the opportunity and remove the excess dip around the emblem and within the negative space of the letters. But, again, make sure to do it slowly using the toothpick or the tweezers.
Step 5: Let it Dry Fully.
Once you have all the excess dip removed, leave the emblem to dry for 4 hours, at least. And just like with the previous step, make sure your car is in a dry place, safe from any water or moisture. After that, you will be able to drive your car safely without worrying that the emblem will lose its new coat of paint.
Do’s and Don’t’s of Blacking Out Car Emblems.
- Do get at least two cans of both Plasti Dip and Plasti Dip Glossifier
- Don’t forget to mix the cans well, even during the coating itself
- Do mask off everything properly
- Don’t spray around flippantly; make every single coat even
- Do pay attention to the corners and the negative space; logos and letters tend to have those, and if your car isn’t matte black, the Plasti Dip inside of those will show
- Don’t rush anything; Plasti Dipping the emblems is a process that takes a while to finish properly
- Do wear protection; Plasti Dip might exude toxic fumes that can impede your health
- Don’t expose your car to any moisture or liquids until the Plasti Dip is fully dry. Otherwise, your coating will peel right off.
Read also: How to Replace Toyota Corolla Headlight Assembly
How to Plasti Dip Tail Lights DIY Guide
Obviously, most people who use Plasti Dip to tint tail lights will tell you that you’ll need a specific type of dip, namely Smoke. The main reason is that it’s easy to apply and peel off, plus it doesn’t come with any legal risks. However, you can do the same thing with the regular matte black Plasti Dip and Glossifier. In fact, you will be using most of the tools and materials we’ve already listed.
Step 1: Clean the Tail Lights Well
Using a clean cloth and some soap water, clean the tail lights well from any dirt or grime. You might even make do with a simple dry cloth if your car is fairly clean.
Step 2: Mask Everything Off
Just like with the emblems, use newspapers and masking tape to isolate the area you want to spray the Plasti Dip on.
Step 3: Apply the Coating
Applying Plasti Dip on tail lights is a bit different from how you’d do it on emblems. The most efficient way is to apply a single, light coat of matte black paint first, just enough to make the window look dark. Then, after roughly half an hour, you can apply the first coat of the Glossifier. Follow that with three more Glossifier coats, each roughly 15 minutes after the last.
Step 4: Peel Off the Unwanted Dip and Let Dry
Like with the regular Plasti Dip application, wait for about an hour before peeling off the masking tape and the newspapers. Then let your lights dry for about four hours.
Step 5: Test the Lights After Drying
Your fresh coat of paint mustn’t stop you from having good visibility at night. So, make sure to test your tail lights when it’s dark outside. If it’s below the prescribed legal standards, remove the coat at once.

Do’s and Don’t’s of Plasti Dipping Tail Lights.
- Do apply light coats of matte black Plasti Dip.
- Don’t go overboard or apply more than a single coat of matte black paint
- Do go in with light strokes while using the Glossifier
- Don’t apply the next coat too soon after the last one
- Do try the Smoke spray as well and compare the results for future reference
- Don’t drive immediately after application until you’ve tested the lights first.
Plasti Dip Smoke Tail Lights Benefit
While most people want to learn how to blackout car emblems, a new trend has emerged where car owners tint their tail lights using Plasti Dip; obviously, the first question that everyone has is just how legal this practice is. In other words, should you Plasti Dip tail lights, and are there any real benefits to it?
Well, regarding the legality of tinting tail lights, it all depends on how you do it. Every single car must have tail lights that are visible during the night for obvious safety reasons. Sadly, some tint jobs tend to darken the taillights too much, which hinders visibility. However, if you tint them just the right amount, you will still get the best use of the lights.
The biggest benefit of Plasti Dipping tail lights is aesthetics. After all, having a car with dark, sleek tail lights is just awesome. It looks especially cool if you combine it with other effects, like matte black emblems and a grey, dim grill. Furthermore, the layer of Plasti Dip actually protects the glass underneath from excess grime and dust, so if you need to clean it, peel off the Plasti Dip and reapply at your leisure.
FAQs Related to Blackout Car Emblems

01. How long does Plasti Dip last on emblems?
Generally speaking, if left untouched, Plasti Dip can last up to three years. But, of course, you can easily remove it much earlier if you need to.
02. Can a car wash ruin Plasti Dip?
Yes, a car wash can ruin Plasti Dip. However, this usually only happens it’s put on improperly or if you take it to the car wash too soon after application.
On the other hand, a properly dried Plasti Dip coat will last for years and won’t get as much as a scrape during the wash.
03. Can you spray over old Plasti Dip?
Yes, but you have to be careful that the old Plasti Dip is clean and in good condition. If there’s any dirt, dust, or grime on it, coating it with a new layer of Plasti Dip will have unappealing results.
04. How do you remove old Plasti Dip?
Depending on its condition, you can either remove it with your fingers or use a solution. No matter the option, always make sure that you don’t damage the paint around the emblem.
05. How much does blacking out the cost in a shop?
Whether you blackout the emblems, the grill, the taillights, or the rims in a shop, it will cost you at least a few hundred dollars per job. DIY Plasti Dipping is far cheaper than having a professional do it?
06. Can Plasti Dip be applied to other parts of the car besides emblems and tail lights?
Yes, Plasti Dip can be applied to various parts of a car, including rims, grills, door handles, and even the entire car body. Each application may require a different technique, so it is essential to research the appropriate method for the specific part you wish to coat.
07. How long does Plasti Dip last on car emblems and tail lights?
Plasti Dip can last for several years on car emblems and tail lights if properly applied and maintained. Factors such as weather conditions, exposure to sunlight, and the frequency of car washes can impact its longevity. To ensure the longest-lasting results, it’s essential to follow the recommended application process and perform regular maintenance.
08. Is it possible to remove it from car emblems and tail lights?
Yes, Plasti Dip can be easily removed from car emblems and tail lights by peeling it off. The removal process can be facilitated by applying a thin layer of Goo Gone or a similar adhesive remover to the edges of the Plasti Dip and gently peeling it away. Always ensure that the adhesive remover is safe for use on your car’s surfaces before applying it.
09. Can I use a different color of Plasti Dip for my car emblems and tail lights?
Plasti Dip is available in a variety of colors, allowing you to customize your car emblems and tail lights to your liking. However, it’s essential to consider local regulations and safety standards when choosing a color for your tail lights, as some colors may not be permitted or could reduce visibility.
10. How do I maintain it on my car emblems and tail lights?
To maintain Plasti Dip on your car emblems and tail lights, avoid using abrasive cleaning materials or chemicals that could damage the Plasti Dip. Instead, use a gentle soap and water solution with a soft cloth or sponge to clean the coated areas. Additionally, it’s a good idea to periodically inspect the Plasti Dip for signs of wear or peeling and touch up or reapply the coating as needed.
Final Thoughts
Knowing how to blackout car emblems will help you rejuvenate your vehicle. But by all means, don’t stop there. Plasti Dip is an excellent tool that you can use for various car parts, including rims, steering wheels, and grills. All it takes is a bit of patience and creativity.
Check out some other picks from Amazon also: